


Buying tires is a minefield. One minute you’re looking for grip, the next you’re drowning in load indices, UTQG ratings, and radial ply specs. It’s enough to make you keep the old rubber on until the tread bar shows itself. But if you want to stop guessing and start knowing, you need to look under the hood. Or rather, under the tread.
We’re breaking down the anatomy of a tire. No fluff. Just how it’s built, what those confusing sidewall numbers actually mean, and why your tire pressure matters more than you think. You’ll learn to spot heat buildup before it becomes a blowout and diagnose wear patterns like a pro. Let’s get into the build.
The Architecture of Rubber
Tires aren’t just balloons filled with air. They’re engineered composites designed to handle immense stress. A tire is a complex sandwich of materials, each serving a specific purpose. Get the build wrong, and you get failure.
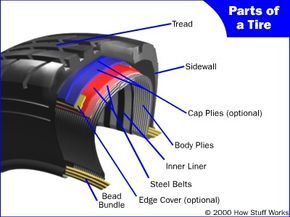
At the core is the bead. This is the steel wire ring that locks the tire to the wheel rim. It has to be strong enough to resist the high pressure inside while staying flexible enough to mount properly. If the bead fails, you’re walking home.
Above the bead sits the sidewall. This is the flexible skin of the tire. It absorbs impacts from curbs and potholes. It’s also where all the jargon lives. The sidewall has to be tough but pliable. Too stiff, and you get a harsh ride. Too soft, and the tire overheats.
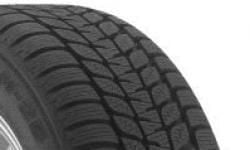
The tread is the part touching the road. It’s made of a durable rubber compound designed to shed water and provide grip. The pattern is calculated to evacuate water and prevent hydroplaning. Deeper grooves mean better wet traction, but they can affect dry handling. It’s a trade-off.
Beneath the tread are the plies. These are layers of fabric, usually nylon or polyester, coated in rubber. They give the tire its shape and strength. In radial tires, the plies run perpendicular to the direction of travel. This reduces sidewall flex and generates less heat. Radials are the standard for a reason.
Running through the center is the belt package. Steel belts reinforce the tread area. They keep the tire stable at high speeds and protect against punctures. Without these belts, the tire would bulge and wear unevenly. The belts are what give radial tires their durability.
Then there’s the casing. This is the overall structure that holds everything together. It’s a balance of strength and flexibility. The casing determines how the tire handles cornering forces and braking loads. A weak casing leads to poor handling and increased wear.
Finally, the inner liner. This is the air-retaining layer. It’s made of butyl rubber, which is almost impermeable to air. It keeps the pressure in for months. If this layer fails, you get a slow leak that drives you insane.
The tire is a system. Every component interacts with the others. Change one thing, and the whole performance profile shifts.
Decoding the Sidewall
The sidewall is a data dump. It looks like gibberish until you know how to read it. These markings tell you exactly what the tire is and

The Skeleton and Skin of a Rubber Tube
Look at a cross-section of a tire and you’re not just seeing rubber. You’re seeing a engineered sandwich of steel, fabric, and chemistry designed to keep your four-wheel drive on the pavement. It starts at the bottom with the bead bundle. This is a loop of high-strength steel cable coated in rubber compound and bead filler. It’s the anchor. Without it, the tire wouldn’t seat against the wheel rim. It takes the brute force of tire mounting machines and the centrifugal fury of high-speed rotation without popping off.
Above that lies the body. This is where the plies come in. These are layers of fabric, usually polyester cord. In a standard radial tire, these cords run perpendicular to the tread. They’re coated in rubber to seal the air and bond with the rest of the structure. You’ll hear people talk about ply ratings for strength. Most passenger cars use two body plies. A commercial jetliner? Those tires need 30 or more plies to handle the weight of a Boeing 747. Don’t try to buy a set for your Honda Civic.
Steel Belts and Cap Plies
Modern tires rely on steel-belted radial construction for the tread area. These belts are the reason your tire doesn’t shred if you hit a pothole. They provide puncture resistance and keep the footprint flat against the road for maximum grip.
Some high-end tires add cap plies. These are extra layers of polyester fabric. You won’t find them on every tire, mostly on high-speed-rated models. Why? Because at 150 mph, the components want to fly apart. Cap plies hold everything in place.
The sidewall is the lateral backbone. It keeps the air in and protects the body plies. It also determines how much the tire flexes. A stiffer sidewall means better handling but a harsher ride.
The Green Tire and the Waffle Iron Effect
Before any of this becomes a road-ready tire, it’s assembled in a building machine. The components are placed in the correct location, but they aren’t held together tightly yet. There are no tread patterns. No markings. Just a loose assembly of materials.
This is called a green tire.
The next step is brutal heat. The green tire goes into a curing machine. Think of it like a waffle iron. The mold presses into the rubber, carving out the tread grooves and the little text on the sidewall. The heat triggers vulcanization. The chemicals in the rubber cross-link, bonding all the components together permanently. After a quick inspection, the tire is done.
Decoding the Sidewall Numbers
You’ve picked out a tire. Now what does that string of numbers and letters mean? It’s not random. It’s a code.
Tire Type
The first letter sets the stage.
* P : Passenger vehicle.
* LT : Light truck. Heavier duty.
* T : Temporary spare.
Tire Width
The next number, like 235, is the width in millimeters. It’s measured from sidewall to sidewall. Note that this assumes the tire is mounted on its intended rim size. Put a wide tire on a narrow rim and the measurement changes.
Aspect Ratio
This is the height percentage. If you see 75, the sidewall height is 75% of the width.
* Math: .75 x 235 mm = 176.25 mm (or about 6.94 inches).
Lower aspect ratio means shorter sidewalls. Why do enthusiasts prefer low-profile tires? Lateral stability. When you corner hard, the car leans. The tire fights back. A shorter, stiffer sidewall resists that flex. It gives you sharper steering response. High-performance tires almost always have lower aspect ratios than your average commuter tire.
Tire Construction
The letter R stands for Radial. This is the standard. The cords run perpendicular to the direction of travel.
Older tires used D (Diagonal bias) or B (Bias belted). In those, the fabric ran at an angle. They’re heavier and generate more heat. Radials are faster and cooler running.
The note about ply count usually refers to the sidewall area and the tread separately.
Rim Diameter
The final number is the wheel diameter in inches. If it says 16, it only fits a 16-inch wheel. No amount of persuasion will make it fit a 15-inch rim.
Which Matters More: Width or Aspect Ratio?
When building a setup, you have to choose. Do you want a wide, flat look with a low profile? Or a taller sidewall for comfort and impact absorption?
Wider tires offer more contact patch. More grip. But they also increase rolling resistance. They wear out faster. And in the rain, a wider tire is more prone to hydroplaning if the tread isn’t designed well.
Lower aspect ratios look aggressive. They handle better. But every pothole feels like a rock in your shoe. The trade-off is real.
Where should you draw the line? It depends on your driving style. If you’re tracking your car, go low. If you’re commuting on bad roads, go high. The numbers don’t lie, but they don’t tell the whole story either. The compound matters. The tread pattern matters. The way you drive matters most.
The rest is just geometry.
You’re standing in a tire shop or staring at a sidewall. The numbers mean nothing unless you know the code. The Uniform Tire Quality Grading (UTQG) system exists to standardize three specific metrics for passenger car tires. The U.S. National Highway Traffic Safety Administration (NHTSA) maintains the database. You can check specific ratings there, but the sidewall itself tells you the raw data.
What UTQG Actually Means
The UTQG rating breaks down into three distinct categories. None of them are perfect predictors of reality, but they offer a baseline for comparison.
Tread Wear
This number is a relative measure, not an absolute guarantee. The government tests these tires on a controlled track. The higher the number, the longer the tread is expected to last under those specific lab conditions. No one drives on a government test track. Your roads are worse. Your speeds vary. The surface texture changes. So, the number is inaccurate as a precise predictor of mileage. It is accurate as a relative indicator. A tire with a tread wear rating of 400 will almost certainly outlast one rated at 200. Just don’t treat it as a mileage warranty.
Traction
The scale here is AA, A, B, or C. AA is the top. This rating measures straight-line stopping ability on wet concrete and asphalt. It does not measure cornering grip. It does not measure handling. It measures braking distance. The Firestone Wilderness AT and Radial ATX II models, which have been subjects of public scrutiny, hold a traction rating of B. That’s middle-of-the-road for wet braking performance.
Temperature
The scale is A, B, or C. This measures heat dissipation. Can the tire structure shed heat effectively? The rating applies only to a properly inflated tire carrying no more than its rated load. Underinflation changes the equation. Overloading does too. Excessive speed generates heat. Too much heat accelerates wear. It can also cause catastrophic failure. The same Firestone models mentioned above carry a temperature rating of C. That’s the lowest grade. It means they struggle more with heat buildup than higher-rated options.
Service Description: Load and Speed
The service description is the alphanumeric code that follows the tire size. It tells you the physical limits of the rubber.
Load Ratings
The load index is a number. It correlates to the maximum weight the tire can support. A higher number means higher capacity. A load index of “105” equals 2039 pounds (924.87 kg). You won’t see the weight in pounds printed directly next to the index. A separate note on the sidewall indicates the load rating at a specific inflation pressure. Always check the pressure. A tire loaded beyond its index will overheat and fail.
Speed Rating
The letter following the load index is the speed rating. It indicates the maximum speed the tire can sustain at its rated load. An S rating allows speeds up to 112 mph (180.246 kph). There is a full chart of these ratings. Going faster than the letter allows compromises the tire’s structural integrity. The sidewalls may flex too much. The internal heat will spike. Stick to the rating for the vehicle’s intended use.
Calculating Tire Diameter
Knowing the specs lets you calculate the overall diameter. This matters for speedometer accuracy, gearing, and ground clearance. You need the tire width and the aspect ratio.
First, multiply the width by the aspect ratio to get the sidewall height.
Tire height = 235 x 75 percent = 176.25 mm (6.94 in)
Next, add twice the sidewall height to the rim diameter. The rim diameter is the wheel size.
2 x 6.94 in + 15 inches = 28.9 in (733.8 mm)
This is the unloaded diameter. It’s a static number. Put weight on the tire and the diameter shrinks. The sidewalls compress. The actual rolling diameter is smaller than the calculation suggests.
Decoding Traction Labels
The industry throws around terms that don’t mean what you think they mean. Some are marketing fluff. Some are regulated standards. The MS, M+S, M/S, or M&S designation is a specific claim. It stands for Mud and Snow. It means the tire meets Rubber Manufacturers Association (RMA) guidelines for that category. It’s a geometric certification, not a performance guarantee.
To get the Mud and Snow designation, the tread must meet strict dimensional requirements. The RMA bulletin for passenger and light truck tires outlines the geometry.
- Pockets and Slots : New tires must have multiple pockets or slots on at least one tread edge. These features must meet specific dimensions based on mold measurements. They must extend toward the tread center by at least 1/2 inch from the footprint edge. This is measured perpendicularly to the tread centerline. The minimum cross-sectional width for these slots is 1/16 inch. The edges of these pockets must angle between 35 and 90 degrees relative to the direction of travel.
- Voids : The total tread contact surface void area must be at least 25 percent based on mold dimensions.
Put simply, the tire needs a row of substantial grooves starting at the edge and reaching inward. At least a quarter of the surface area must be open space. This allows the rubber to bite into softer surfaces. It doesn’t mean the tire will perform well in deep powder. It just means it meets the geometric threshold for being called an “all-season mud and snow” tire.

Severe Snow Use Testing
The geometry is simple enough on paper. More void space in the tread means the rubber can bite deeper into snowpack, theoretically improving grip. But looking at the specs alone doesn’t tell you if a tire actually handles a blizzard. There is no mandatory testing involved in the basic design phase.
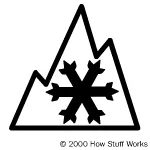
To fix this gap between theory and reality, the Rubber Manufacturers Association and the broader tire industry codified a strict standard. It is called Severe Snow Use. You will see it as a specific icon—a mountain peak with a snowflake inside—placed right next to the M/S (Mud/Snow) designation.
Passing this bar requires more than just a zig-zag tread pattern. Manufacturers must prove their tires meet the ASTM F-1805 snow traction test. The benchmark is the ASTM E-1136 Standard Reference Test Tire. The rule is binary: the tire must attain a traction index equal to or greater than 110. If it scores lower, it fails. It cannot be sold as suitable for severe snow conditions.
This isn’t just about geometry anymore. The tire has to outperform the reference standard on actual snow. It must demonstrate superior traction under equivalent load percentages. The M/S requirement is still there, but the performance hurdle is significantly higher.
Hydroplaning
Standing water is a silent killer for traction. When a car hits a puddle, the tire pushes water out of the way. If the water can’t escape fast enough, it builds up pressure beneath the tread. The rubber lifts off the asphalt. The tire is now floating on a film of water.
Gone is the friction. Gone is the steering control. The car becomes a sled.
Engineers combat this with hydroplaning resistance. The primary weapon is deep grooves running parallel to the direction of travel. These channels act as escape routes for water. They channel the liquid away from the contact patch faster than the car can drive through it. It is a simple physics problem solved with rubber design.
How Tires Support a Car
It defies intuition. A car weighs thousands of pounds. The tires hold maybe 30 pounds per square inch (psi) of air. How does that small number lift such a heavy mass?
Look at the tires on your car. They are not perfect circles. Pressed against the road, they flatten. That flat section is the contact patch.
If you could see under your car, you would see four rectangles. Measure them. Add up the total area. Multiply that area by the tire pressure. The result approximates the weight of the vehicle.
“If you add more weight or decrease the pressure, then you need even more square inches of contact patch, so the flat spot gets bigger.”
Pressure dictates the size of that footprint. Load it down with passengers and cargo. The contact patch expands. Drop the pressure. The patch grows again, sacrificing handling for surface area. It is a constant trade-off between inflation, weight, and grip.
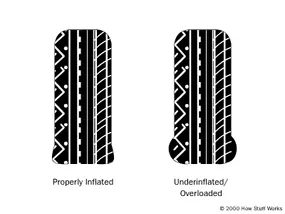

Look at the difference between a healthy tire and one that’s been neglected. An underinflated or overloaded tire isn’t round anymore. It’s squashed. When it spins, the contact patch has to constantly reset itself against the road. The rubber at the bottom gets bent outward. Bending rubber takes effort. The more you have to bend it, the more work the engine has to do.
Rubber isn’t perfectly elastic. It doesn’t give back all the energy you put into it. Some of that force turns into heat through friction and internal deformation. Steel belts flex too. Since an underinflated tire has to bend more, it generates more heat. This is why blowouts happen.
What Are CRF Numbers?
Manufacturers publish the coefficient of rolling friction (CRF) for their tires. Don’t confuse this with traction. CRF measures drag. It tells you how much force is needed to keep a tire moving. The formula is simple: Force equals CRF multiplied by the weight on the tire.
Here is what typical numbers look like across different wheel types.
- Low rolling resistance car tire: 0.006 – 0.01
- Ordinary car tire: 0.015
- Truck tire: 0.006 – 0.01
- Train wheel: 0.001
Let’s do the math. Imagine a 4,000-pound car. Its tires have a CRF of 0.015. Multiply 4,000 by 0.015. You get 60 pounds of force required to push the car forward. Just to overcome rolling resistance.
Power is force times speed. So the energy cost changes with velocity. At 75 mph, those tires consume 12 horsepower. At 55 mph, it drops to 8.8 horsepower. That energy doesn’t vanish. It becomes heat. Most of it stays in the tire. Some of it bends the road surface slightly.
Three variables dictate how much heat builds up:
- The weight on the tire.
- The speed of travel.
- The CRF, which spikes when pressure drops.
Driving on sand changes the equation. The ground absorbs more heat, raising the CRF significantly. But on asphalt, the tire takes the hit.
Problems With Tires
Heat is the silent killer of tires. It breaks down the materials. It weakens the structure. And it starts with pressure.
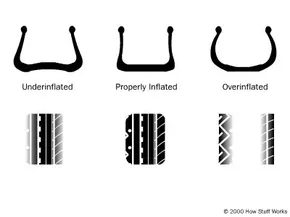
Underinflation does nasty things to your rubber. It forces the outer edges to bear the brunt of the weight. You’ll see that wear pattern quickly. It also kills your MPG. Heat builds up inside the casing, which is a recipe for failure. Check your pressure with a gauge once a month. Don’t guess.
Overinflation is just as bad, just differently bad. The center of the tread takes the hit. The tire pressure should never exceed the maximum listed on the sidewall. Manufacturers often suggest a lower pressure than the max for a reason. It gives a softer ride. Higher pressure improves mileage though. You trade comfort for range.
Misalignment is the silent killer. It causes uneven wear on either the inside or the outside. The tread might look rough. Slightly torn. Almost shredded. If your car pulls to one side, check your alignment immediately.
There is more nomenclature around a tire than a simple tube. Consider the radial cord body. Think about the two adjacent tread ribs and patterns. Other materials play a role too. The next time you shop for tires, keep these factors in mind. They matter on the road.
Understanding Tire Construction and Specs
A tire is a composite. Steel. Polyester. Rubber. It’s not just one material. The small print on the sidewall isn’t decoration. It’s data.
- Tire type
- Width
- Aspect ratio
- Construction
- Rim diameter
- Uniform tire quality grading
- Service description
This code tells you what you’re buying. Read it.
Common Tire Issues Explained
People mess up tires in predictable ways. Underinflation. Overinflation. Misalignment. These are the big three. They shorten life. They cost money. Fix them early.
“Hydroplaning occurs when water cannot squirt out from under the tire quickly enough.”
Hydroplaning happens in standing water. The tire lifts off the ground. It sits on a layer of water. Traction drops to near zero. The car goes out of control. Fast.
How Long Do Tires Last?
Car and Driver recommends replacement between six and ten years after purchase. Age matters. Even if the tread looks new. Rubber degrades. Cracks form. Don’t wait until the tread is bald. Check the DOT date code.
Hydroplaning is a speed-dependent issue. It’s also a tread-depth issue. Shallow treads can’t channel water away. Keep your grooves deep.
Tire Care Tips
- Check pressure monthly.
- Rotate tires every 5,000 to 7,500 miles.
- Align wheels after hitting a deep pothole.
- Replace tires if sidewalls show bulges.
- Monitor tread depth with a quarter. Lincoln’s head should be covered.
Your tires are your only contact with the road. Treat them with respect. They don’t speak. They just wear.


